Build Your First App with AI: From Idea to APK on Your Phone, Zero Coding Required
If you've never written a single line of code, seeing the phrase "build an app" probably makes you feel like it's something that has nothing to do with you. Programming, packaging, signing, installation packages — these words sound like a domain that requires four years of a computer science degree just to get to the door.
But the truth is, in 2026, things have changed. You only need two things: an AI large model willing to chat with you, and an Android phone with ToApp installed. The rest, I'll walk you through step by step.
This article is for people with absolutely zero coding background. I won't assume you know any programming concepts, and I won't skip any step that "seems obvious." By the end, you'll see your very first app on your phone — and the moment its icon sits on your home screen, you'll understand why I wrote so many words.
The Two Things You Need
Before we start, make sure you have these two things. Just two.
1. A chat window with an AI large model. Whether it's ChatGPT, Claude, Gemini, DeepSeek, or any other mainstream model you can access — it'll work. You don't need a paid plan; the free tier is enough. If you're using a local AI assistant app, that's fine too — as long as it can read your text and generate code snippets.
2. An Android phone with ToApp installed. If you don't have ToApp yet, you can download it here. It's a completely free tool. All operations happen locally on your phone — none of your data gets uploaded to the cloud. That's why we can do the entire flow with just a phone today. No computer, no Android Studio, no dev environment setup.
Ready? Let's begin.
The Map of the Whole Process
Before we get hands-on, I want you to have a bird's-eye view of the whole process. We'll break "build your first app" into five steps:
-
Chat with AI to generate your first HTML file
Tell the AI what content you want. It'll write a complete web page file for you.
-
(Advanced) Split into HTML / CSS / JS project files
When content grows, learn to have the AI organize code into multiple files for maintainability.
-
Package into a ZIP file
Put your project files into a ZIP archive in the correct structure.
-
Generate an APK with ToApp
Hand the ZIP (or a single HTML) to ToApp, customize the name and icon, and generate an installer with one click.
-
Install on your phone
Allow installation, tap to install, open your first app.
It looks like a lot of steps, but each one is short. We'll take it slow.
Step 1: Chat with AI to Generate Your First HTML File
Open your AI chat window. What we're about to do is have the AI write a web page for you. This web page will be the content displayed inside your app.
How to ask the AI
The key to chatting with AI is being clear about what you want. You don't need to know any "prompt engineering" jargon — just treat it like a patient assistant that needs clear instructions. Here's an example you can copy directly:
I want to build a small personal tool app. The content is a "daily habit tracker" page. Please write me a complete HTML file with these requirements:
1. Single page, dark background, clean modern style
2. List 5 habits: Read 30 min, Drink 8 glasses of water, Exercise 20 min, Meditate 10 min, Sleep early
3. Each habit has a checkbox that can be toggled
4. Show today's date at the top
5. A line of encouraging text at the bottom
6. All styles should be inside the HTML file — don't rely on external files
7. Optimized for phone screens
See — this request contains three key pieces of information: what the content is (habit tracker), what it looks like (dark, clean, mobile-friendly), and technical requirements (single file, inline styles). You can follow this exact structure and swap "habit tracker" for anything you want — a reading notes page, a personal homepage, a simple calculator, a birthday reminder list, a collection of your favorite recipes.
The AI will reply with a block of code — a complete HTML file. It'll look something like this (here's a sketch; yours will be richer):
<!DOCTYPE html>
<html lang="en">
<head>
    <meta charset="UTF-8">
    <meta name="viewport" content="width=device-width, initial-scale=1.0">
    <title>Daily Habit Tracker</title>
    <style>
        body { background: #0a0a0a; color: #fff; font-family: sans-serif; }
        /* The AI will write all the styles for you */
    </style>
</head>
<body>
    <h1>July 3, 2026</h1>
    <ul>
        <li><input type="checkbox"> Read 30 min</li>
        <!-- other habits -->
    </ul>
</body>
</html>
Saving the code as a file
Once you have this code, you need to save it as a file. On your phone, you can do it like this:
- Method 1 (recommended): Many AI chat websites and apps now support downloading files directly. Just look for a "Download" or "Export" button near the code block the AI generated, choose HTML format, and the code is saved as a
.htmlfile — no copy-pasting needed, much easier. - Method 2: If your AI doesn't support direct download, no problem. Long-press the code block in the chat, select "Copy," then open any text editor on your phone (like the editor built into your file manager, or apps like MT Manager, QuickEdit), create a new file, paste the code in, and save it as
index.html.
One small detail to note: the filename must be index.html. Why? Because later, when ToApp processes local files, it automatically looks for index.html as the entry point. We'll cover this in detail in Step 3.
Once saved, you can open that index.html in your phone's browser to take a look — if it renders the way you wanted, congratulations, you've just written your first web page. It's not an app yet, but it's only a few steps away.
If it doesn't look quite right, that's fine — keep chatting with the AI. You can tell it: "make the colors darker," "bigger font," "add a celebration animation when all habits are checked off." The AI will iterate with you until you're happy. You don't need to understand any code in this process — you just state the requirements, and the AI writes the code.
Step 2 (Advanced): Split into HTML / CSS / JS Project Files
If you're building a simple little tool, the single-file approach from Step 1 is more than enough — you can skip straight to Step 3.
But if you want to build something a bit more complex — a personal homepage with several sections, a recipe collection with interactive effects, or a bookkeeping app with a fair amount of data — putting everything in one index.html makes the file very long and hard to navigate when you want to make changes later.
That's when you can ask the AI to split the code. A standard web project usually looks like this:
myapp/
├── index.html      ← page structure
├── css/
│   └── style.css   ← styles
├── js/
│   └── main.js     ← logic (e.g. checkbox toggle behavior)
└── images/
    └── logo.png    ← images
You can say to the AI like this:
Please split the habit tracker page you just made into three files:
index.htmlfor the page structure only,css/style.cssfor all the styles, andjs/main.jsfor the checkbox logic. Give me the full contents of each file separately.
The AI will give you three blocks of code. Save each one as the corresponding file. On your phone, you can use a file manager to create a folder (say, myapp), then create css, js, and images subfolders inside it, and place the files in their proper locations.
Why split?
The benefit of splitting isn't now — it's later. Say you use this for a month and want to change the color scheme. If everything is in one file, you'd have to dig through a huge block of code to find the styles. But if they're separate, you just open style.css and the change is much clearer. It's like organizing things in your home into different drawers instead of piling everything on one table.
Of course, if you don't feel the need to split now, don't. A single file can still make a complete app. It won't affect the final result.
Step 3: Package into a ZIP File
This step is about organizing your web files into an archive that ToApp can process. There are a few important details here, so I'll be thorough — this is where most people run into trouble.
The single most important rule: index.html must be at the ZIP root
When ToApp reads a ZIP file, it automatically looks for index.html or index.htm as the entry file. This entry file must be at the root of the ZIP, or at most 2 directory levels deep.
What's "the root"? It's the level you see first when you open the ZIP file. The correct structure looks like this:
myapp.zip (when opened, you see directly)
├── index.html      ✅ at the root
├── css/
│   └── style.css
├── js/
│   └── main.js
└── images/
    └── logo.png
The most common mistake looks like this — when you compress on a computer or phone, you accidentally include the outer folder too:
myapp.zip (when opened, you see a folder)
└── myapp/          ❌ one extra layer
    ├── index.html
    ├── css/
    └── ...
In this case, index.html is effectively at myapp/index.html inside the ZIP. It's still within 2 levels so it can be detected, but if it goes one level deeper (like myapp/v2/index.html), it won't be found. To avoid trouble, build a good habit: when compressing, select the files inside and compress those — don't select the outer folder.
If you're using a single HTML file, there's no such issue — just move on to the next step.
The logic of file paths: what's a "relative path"?
Once your project is split into multiple files, index.html needs to reference css/style.css and js/main.js via "paths." These are called "relative paths" — relative to where index.html itself sits.
In the correct structure above, index.html and the css folder are at the same level, so index.html contains:
<link rel="stylesheet" href="css/style.css">
<script src="js/main.js"></script>
The css/style.css here means "from the current directory, go into the css folder and find style.css." As long as the directory structure inside the ZIP matches the paths written in index.html, all references will resolve correctly.
When the AI generates code for you, it uses this relative path style by default, so you usually don't need to worry about it. You just need to make sure that after packaging into a ZIP, the folder hierarchy matches the paths the AI wrote.
A few file naming rules to keep in mind (these come from ToApp's FAQ page — here are the most important ones):
1. Filenames must not contain .. (this is called "path traversal" and will be blocked)
2. Filenames must not start with / or \
3. Executable files (.exe .dll .so .apk .bin .sh .bat .cmd .ps1) are automatically filtered — you don't need them and can't include them
4. Single-level filenames should not exceed 255 bytes; full paths should not exceed 4096 bytes
5. ZIP can hold at most 500 files, total size up to 50MB — for a personal tool, you basically never hit this limit
About ZIP encoding: a small pitfall
There's one trap that's easy to fall into: if your filenames contain non-ASCII characters (like accented letters or CJK characters), and you use Windows' default compression tool, it may pack with GBK encoding by default. This can cause filenames to be garbled when ToApp extracts them, and the files can't be found.
The fix is simple: use 7-Zip or WinRAR and select UTF-8 encoding. If you're compressing on your phone, most mainstream archive apps default to UTF-8, so it's usually not an issue.
Of course, the most robust approach is to stick to ASCII letters and digits in filenames — like images/photo.png instead of localized filenames. That sidesteps the encoding issue entirely.
Alright — your ZIP file should be ready. Let's move on to the most exciting step.
Step 4: Generate an APK with ToApp
Open ToApp on your phone. If it's your first time, it'll ask you to agree to the privacy policy and terms of service — that's standard, go ahead and agree.
Choose the "Local Files" mode
ToApp supports two input modes: one is to enter a URL (convert an online website into an app), and the other is to import local files. We're using the second one today.
On ToApp's create page, choose "Local Files" mode. You'll then see two options:
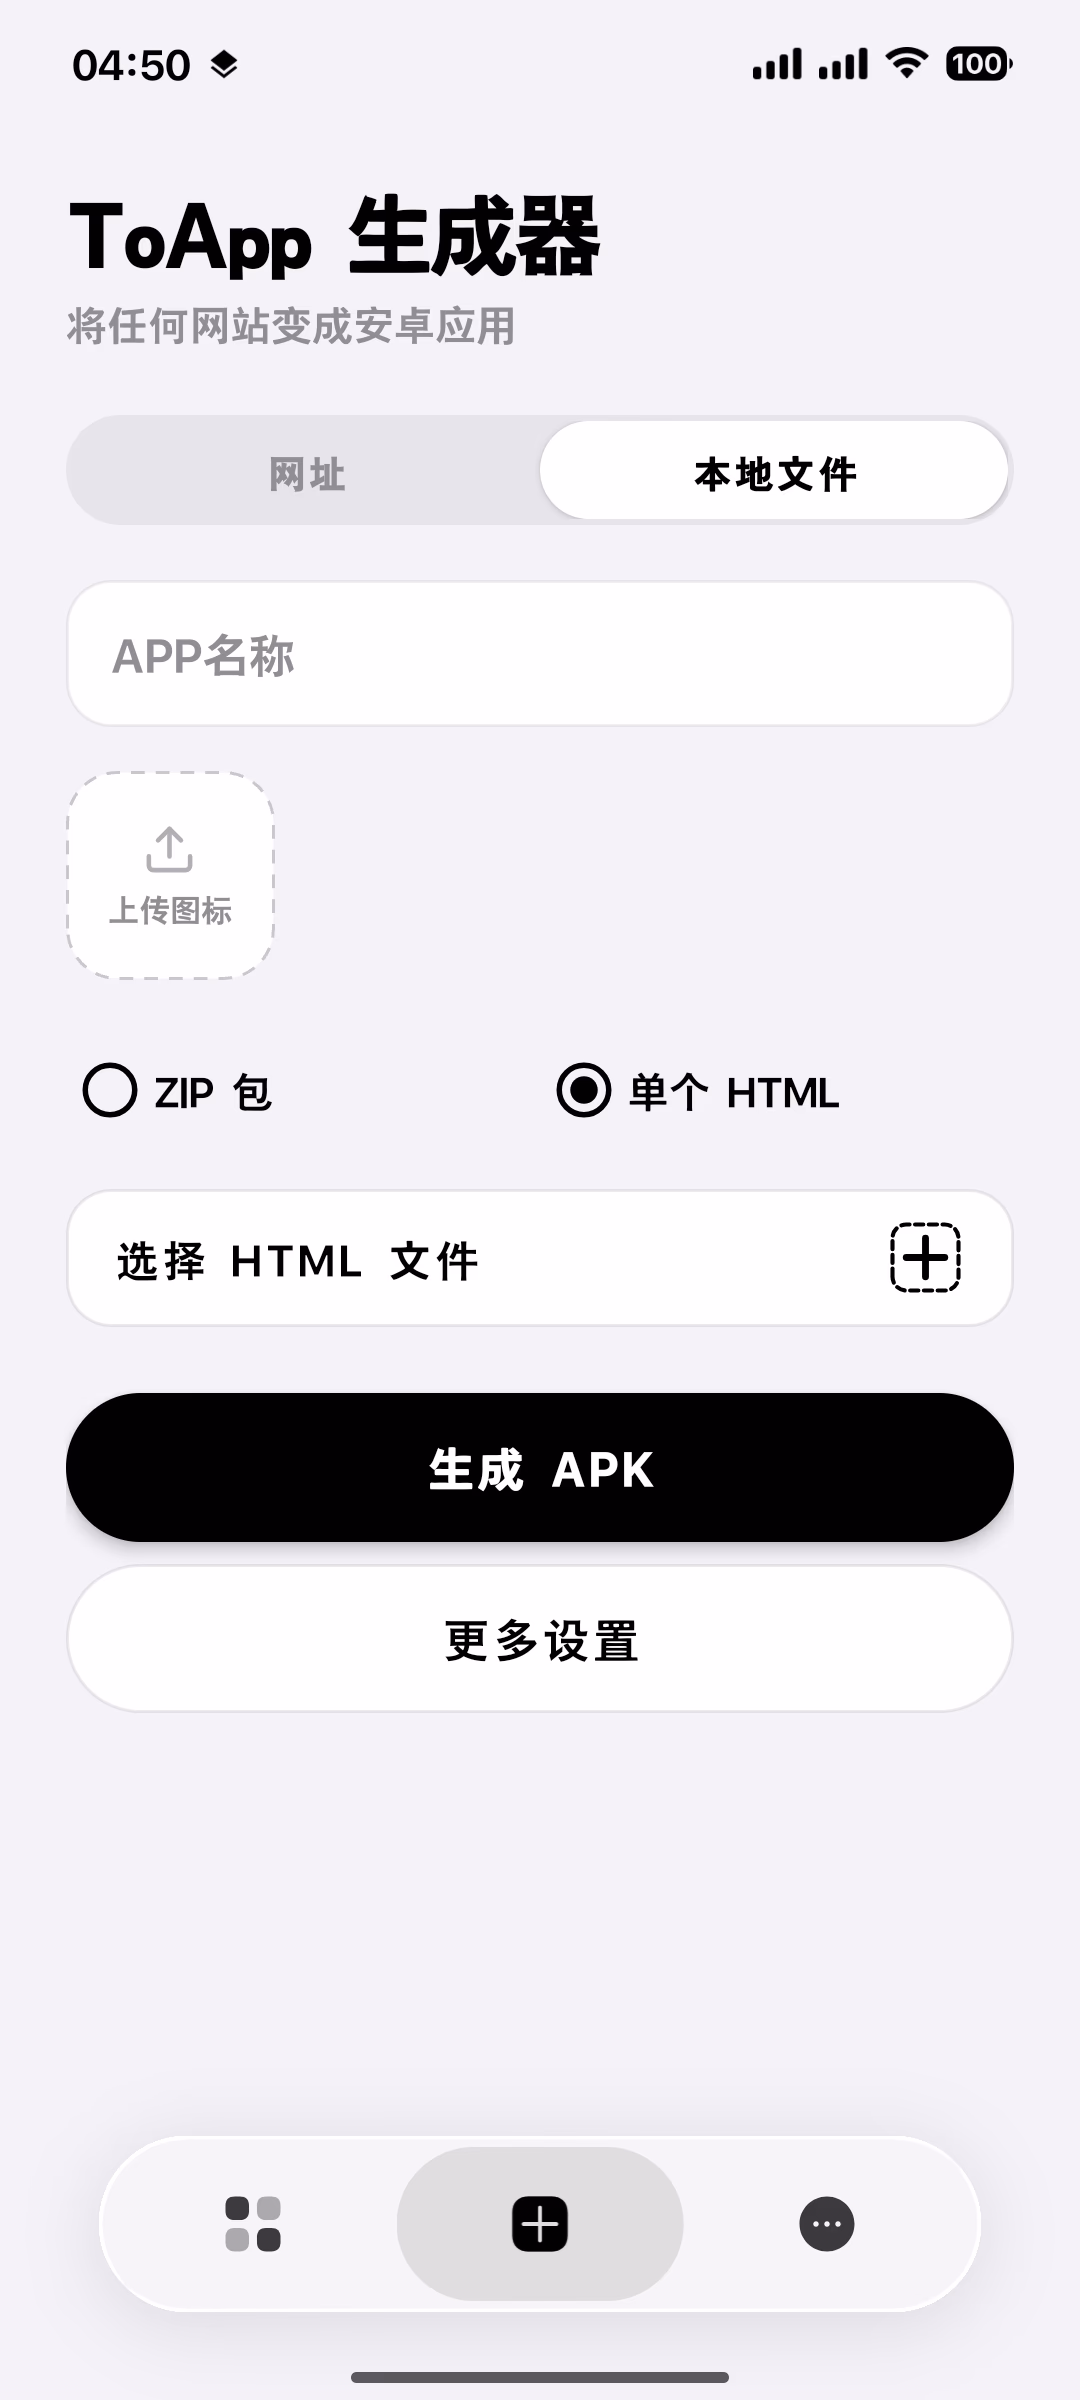
- Import ZIP file — if you split the project in Step 2, or even if you only have one
index.htmlbut packaged it as a ZIP, pick this. - Import a single HTML file — if you only have one
index.htmland don't want to bother zipping it, you can pick this directly. ToApp will treat it as the entry automatically, regardless of what you originally named it — it'll be renamed toindex.html.
After choosing, find the file you saved earlier and import it.
Customize your app
After importing, ToApp lets you set some app info. This is the part that makes the app truly "yours" — take your time:
- App name: give your app a name. Like "My Habits," "Sam's Homepage," "Grandma's Recipes." This name will appear under the icon on your phone's home screen.
- App icon: pick an image you like as the icon. You can have the AI generate one (e.g. ask it for a minimalist icon as a PNG), or just use a photo from your gallery. If you don't want to bother, ToApp will use a default icon.
- Package name: this is the app's internal identifier, usually auto-generated based on the app name. You don't need to touch it — keep the default.
If you want to go a bit further, you can open "More Settings" and enable dark mode or edge-to-edge display (content extends to the screen edges for immersion). These are all optional — the app works fine without them.
Tap "Generate APK"
Once you've set things up, go back to the create page and tap the generate button. ToApp does all the packaging work locally on your phone — signing, compression, generating the installer, all without needing an internet connection. It usually takes just a few seconds to a dozen seconds, depending on your project size.
When it's done, ToApp tells you where the APK file was saved (usually in your phone's Download/ToApp directory). It also asks if you want to install it directly — say "yes" and we move to the final step.
Step 5: Install on Your Phone
This step may show you a "looks like an error" prompt. Don't panic.
When you tap install, Android shows a message along the lines of "For your security, installing apps from this source is not allowed." This isn't a ToApp problem — it's Android's default behavior for any app that doesn't come from an official app store.
How to fix it:
- On the prompt, tap "Settings" (or "Allow installation from this source").
- Android jumps to the "Install unknown apps" permissions page. Find ToApp and toggle the switch on.
- Return to ToApp and tap install again.
This time the install goes through. When it's done, you'll see "App installed."
Open your first app
Tap "Open," or go back to your home screen and find the icon you set — it's just sitting there, like any other app.
Tap it.
What you see is the page you designed with the AI. Its icon is the one you picked. Its name is the one you chose. Every line of text, every color, every button — it's all what you wanted. It's not a web page. It's a real, independently running Android application, installed on your own phone, that you can open without any network.
In this moment, you're a developer.
A Few Closing Words: On "Zero Background" and "A Sense of Accomplishment"
I want to talk seriously about why this is worth doing.
Many people feel a sense of distance from "building an app." They think it's something for programmers, for tech companies, for something far away from them. That distance makes people give up before they even start — "I can't write code," "I don't even know what HTML is," "What does this have to do with me?"
But what you did today proves something: with the help of AI large models, "writing code" is no longer the barrier to building an app. The real barrier is whether you have a small idea you want to bring to life, and whether you're willing to spend an hour making it happen.
The app you built today may be simple. It may even be a little rough. It has no user system, no cloud sync, no app store listing. But it's yours. You started with an idea, turned it into a web page with the AI, and then packaged it into an icon that can sit on your home screen. Throughout this process, you made every decision — what it's called, what color it is, what features it has, what the icon looks like. The code was written by AI, but the app is yours.
This feeling of "I made this" is called a sense of accomplishment. It's a special thing — it's not someone else praising you, it's you knowing that, from nothing, you completed something. For someone starting from zero, the first app often brings a stronger sense of accomplishment than any app that comes after. You suddenly realize that "development" isn't a closed circle — that you can do it too.
And more practically, the workflow you learned today — AI generates content, ToApp packages it into an app — is reusable. Next time, you could make a birthday wish app for a family member, a small album tracking a pet's growth, a meditation timer for yourself, or turn your grandmother's recipes into an app as a gift. As many ideas as you have, that's as many apps as you can make.
I can't promise every app you build will be perfect. But I can promise: with each one, you'll be more skilled than the last. Today you spent twelve minutes reading this tutorial and maybe half an hour getting hands-on. Next time, you'll be much faster.
Alright — go play with the app you just made. And if a friend asks, remember to tell them: I made this myself.
Article too long? Hard to follow?
Click to copy everything, send it to your AI, and let it teach you step by step how to use ToApp to turn local files into your own app
Ready to Build Your Next App?
ToApp is completely free, no ads, all data processed locally. Put every small idea in your pocket.
Download ToApp Free →